

Backend User Permissions
After a Power BI connection is saved, the Power BI section may not appear in the backend navigation for some users. This is a permissions issue — the connection is valid, but the backend user has not been granted access to the Power BI plugin. Curator automatically grants backend permissions to the user who saves the connection. Other backend users must be granted access manually:- Log in as a super-administrator.
- Navigate to Settings > Administrators.
- Open the affected user’s record and click the Permissions tab.
- Under the PowerBI section, enable Power BI administrator.
- Save the user record.
User Menu Access Warnings
When viewing the User Menu Access tab in the backend, Power BI items may display an amber warning icon (⚠) next to the menu entry. This icon means Curator cannot preview a user’s access to that item because the Admin Registered App is not configured. Without an Admin connection, Curator has no way to query Power BI’s Admin API to determine which workspaces and reports a user can see. How to resolve: Complete the Azure Admin Registered App Setup and enter the resulting credentials under on the Admin tab. Once the Admin connection is saved, the warning icons will disappear and User Menu Access will correctly reflect each user’s Power BI permissions.Backend Troubleshooting
The backend integration with Power BI is straightforward - there’s one reliable way to test it and only a few common failure points.Test if Backend is Working
Follow these steps to verify your backend connection:- Click the Clear Cache button (top right) to ensure fresh data.
- Click the New Report button to navigate to the “Create Report” page.
-
Use the dropdown menus to select a workspace and report
- Success: If you can select both workspace and report, your backend is working! Skip to the Frontend section
- Problem: If either dropdown is empty when it shouldn’t be, continue to the troubleshooting steps below
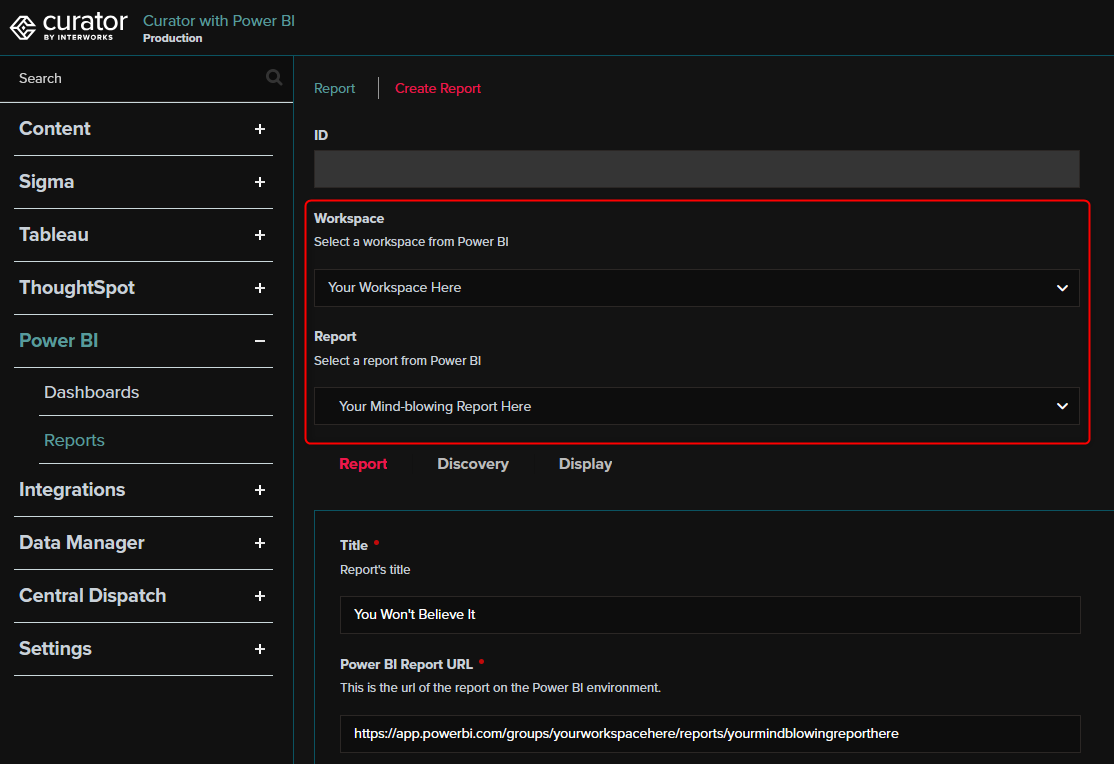
Debug Backend Issues
When the backend isn’t working, you need to see what Power BI is actually telling Curator.Enable Debug Mode
- Click on the Advanced tab.
- Enable debugging Toggle on Debug Mode for Power BI and click save
- Repeat the steps to recreate the issue Follow the steps in Test if Backend is Working again to recreate the issue while debug logging is enabled.
-
Check the logs:
-
Find Power BI calls
Filter for
Power BI API Callusing the search box (top right) - Review responses Click on entries to see Power BI’s detailed responses
Common Solutions
If you see error messages: The solution depends on the specific error. Contact Curator support if the fix isn’t obvious. Some errors may be prefixed withPOWER BI ERROR or ERROR during powerbi flow, but others may have different text.
If responses are blank:
This means Curator can connect to Power BI, but the admin registered app (or non-admin registered app if not using admin)
lacks workspace access. Try these fixes:
1. Grant workspace access
Follow the Add Registered App to Power BI Workspace(s) instructions2. Enable Fabric APIs
Follow the Allow service principals to use Fabric APIs instructions (Note: This change can take time to take effect in Power BI)3. Check security groups
If Fabric APIs are restricted to specific security groups, ensure your registered apps are a member of one of those groups.Expired or Rotated Client Secret
Azure client secrets have a finite lifetime. When you create a client secret in Azure, you choose an expiration period (commonly 6, 12, or 24 months). Once the secret expires, Power BI will reject Curator’s authentication requests and all Power BI content will stop loading until a new secret value is generated in Azure and saved in Curator’s Power BI settings. Symptoms:- Power BI dashboards and reports that previously worked stop loading for all users at once.
- Backend test pages (such as Power BI > Reports) return authentication errors when fetching workspaces or reports.
- Event logs show errors mentioning
AADSTS7000222,Invalid client secret provided, orclient secret has expired. - The Admin and Non-Admin tabs under may still display the previously saved secret, but Azure no longer accepts it.
Curator authenticates to Power BI using a client secret only. Certificate-based authentication is not currently
supported, so rotating the client secret is the only way to restore access once the existing secret has expired.
Admin Permissions Appear Then Disappear
Sometimes the Admin Registered App works right after you save its credentials, then stops working within hours or days. The pattern can repeat: access comes back, then disappears again. This pattern is different from an expired secret, which fails once and stays failed until you rotate it. Symptoms:- The workspace and report dropdowns under Power BI > Reports > New Report populate at first, then come back empty. These dropdowns use the non-admin registered app, so this symptom points at that app.
- Users see Power BI items in navigation after they log in, then lose them later in the same day. Navigation uses the admin registered app, so this symptom points at that app.
- Event log entries for
Power BI API Callalternate between full responses and blank or401/403responses.
Curator caches the result of each Power BI permission check for up to 60 minutes, so a change in Power BI or Azure
can take up to an hour to show in the backend. Click the Clear Cache button in the top right of the backend to
drop that cache. Frontend navigation works differently. When an Admin Registered App is configured, Curator downloads
the list of reports each user can see at the moment that user logs in to Power BI, and stores that list in the
Curator database. Clear Cache does not download the list again. A user must log in to Power BI again, for example by
logging out of Curator and back in, before a change in Power BI or Azure shows in their navigation.
1. Tenant setting has not propagated or was turned off
The Admin Registered App depends on two Power BI tenant settings: Service principals can call Fabric public APIs under Developer settings, and Service principals can access read-only admin APIs under Admin API settings. Older tenants show the first setting as Allow service principals to use Fabric APIs or Allow service principals to use Power BI APIs. Both settings can take up to 15 minutes to propagate across your organization after you enable them. During that window, some requests succeed and others fail. If another admin later turns a setting off, or removes the admin app from the security group that the setting allows, access stops as soon as the cached permission checks expire.- Log in to the Power BI admin portal and select Tenant settings.
- Confirm that Service principals can call Fabric public APIs is enabled.
- Confirm that Service principals can access read-only admin APIs is enabled.
- If either setting is restricted to specific security groups, confirm that the admin registered app is still a member of one of those groups.
- If you changed a setting, wait 15 minutes before you test again.
2. Registered app was removed from a workspace
You manage workspace membership in Power BI, not in Curator. If another admin removes the registered app from a workspace, or lowers its role, Curator loses access to that workspace once the cached permission checks expire. Reports in other workspaces keep working, so the problem can look intermittent.- Log in to the Power BI portal and click Workspaces in the left navigation.
- Hover over a workspace that Curator uses, click the three dots, and choose Workspace access.
- Confirm that both the non-admin and admin registered apps are listed with the Admin role.
- Repeat for each workspace that Curator uses.
3. Client secret was created with a short expiry
Azure lets you choose a custom expiry date when you create a client secret. A secret created with an expiry of hours or days works during setup and then fails as soon as the date passes. If an admin then creates another short-lived secret, the cycle repeats.- Log in to the Azure Portal and open App registrations.
- Open the admin registered app and click Manage > Certificates & secrets.
- Check the Expires column for the secret that Curator uses.
- If the secret has expired or expires soon, create a new one with an expiry of months rather than days.
- Repeat steps 2 through 4 for the non-admin registered app.
- Follow the Expired or Rotated Client Secret steps to save the new value in Curator.
Frontend Troubleshooting
Once your backend connection works and you’ve published Power BI content to Curator’s navigation, users should be able to access it seamlessly.Expected User Flow
When everything is configured correctly (following setup steps 1-4), users should experience:- Log in to Curator Using the method configured in your Authentication Settings.
- Authenticate with Power BI (This may happen automatically with SSO)
-
Access content
Curator displays all accessible content based on platform permissions:
- Tableau content: controlled by Tableau
- ThoughtSpot content: controlled by ThoughtSpot
- Power BI content: controlled by Power BI
Curator can add additional restrictions but cannot expand access beyond what the source platform allows.
Content Loads But Displays Blank
If Power BI content appears in Curator’s navigation and the page itself loads, but the report area renders as a blank space with no visible error, the failure is happening inside the Power BI JavaScript SDK after Curator has already handed off the embed. Curator embeds Power BI content using user-owns-data embedding: the report is loaded with the signed-in user’s own Microsoft Entra ID (Azure AD) access token, and Power BI then decides what that individual user is allowed to see. This means Curator’s server-side work can succeed completely — the content is published, the user passes Curator’s own permission checks, and the embed URL is retrieved — while Power BI still declines to render the report for that particular user. Because this failure happens in the browser, it is not recorded in , and enabling Debug Mode for Power BI will not capture it. The error is reported to the browser console instead:- Open the blank report page in Curator.
- Open your browser’s developer tools (F12) and select the Console tab.
- Reload the page and look for an entry beginning with
onerror called. Expand it to read the error message returned by Power BI.
- The user does not have a Power BI Pro or Premium Per User (PPU) license assigned.
- The user has not been granted access to the workspace, the report, or the report’s underlying dataset.
- The report uses Row-Level Security (RLS) and the user has not been assigned to an RLS role.
Expired access tokens are handled separately. Curator detects a
TokenExpired error and requests a fresh token
automatically, so an expired token is not a typical cause of a permanently blank report.For a user who has signed in to Power BI before, Curator also recovers a token that has expired and cannot be
refreshed silently: it sends that user back through the Microsoft sign-in prompt on a later page load to establish a
new token. An unexpected sign-in prompt appearing on a session that is already signed in to Curator is therefore
normal recovery behavior, not a fault. This only applies to users who have completed the Microsoft sign-in at least
once; a user who has never signed in to Power BI is prompted only through the normal Curator sign-in.Debug Frontend Issues
If users see other Curator content but Power BI content is missing from navigation, follow these steps:Verify Power BI Authentication
- Enable frontend debug mode Follow the steps to enable frontend debug mode.
-
Add debug parameter
In your browser, add
?debug=1to the URL- Example:
https://curator.yourcompany.com/becomeshttps://curator.yourcompany.com/?debug=1If URL already has a?character in it, use&debug=1instead
- Example:
-
Check session data
- Look for the debug bar at the bottom of the screen
- Click Session tab
- Look for a
powerbi>userentry to ensure it has an “accessToken” value.
-
Interpret results
- Missing entry: The user has no Power BI access token. For a user who has never signed in to Power BI, the token is established through the Curator sign-in flow, so have the user log out of Curator and log back in, completing the Microsoft sign-in prompt. (Curator does not re-prompt such a user automatically on page load, to avoid trapping a user who cannot sign in to Power BI on a repeating redirect.)
- Valid entry: Authentication succeeded but Power BI reports no accessible content → Continue to next section
Check Power BI API Responses
- Click on the Advanced tab. Enable the Debug Mode for Power BI toggle and click save.
- Clear cache: Click Clear Cache button (top right) to force fresh API calls.
- Refresh frontend: Go back to Curator’s frontend and refresh the page.
-
Check API logs:
If Power BI content still doesn’t appear:
- Look for Power BI API calls
- Click entries to view detailed responses
- Get support: API responses can be complex. Send the details to Curator support for analysis. Meanwhile, verify the user has proper access to the Power BI workspace and content in question.
Redirect URI Mismatch
If you see an error containingAADSTS50011: The redirect URI specified in the request does not match the redirect URIs configured for the application, the Azure app registration is missing the correct redirect URI.
To fix this:
- Go to the Azure Portal and find your app registration
- Click Manage > Authentication (Preview) in the left navigation
- Under the Web platform, add a redirect URI using your Curator portal’s domain with the
/powerbisuffix- Example:
https://curatorexample.com/powerbi
- Example:
- Save the changes
- Log out and log back in to Curator to verify the fix
SSL Certificate Errors
If you encounter an error like this when testing Power BI connections:POWER_BI_SSL_VERIFY environment variable:
- Default: Standard SSL verification (works on properly configured servers)
- CA Bundle: Download and configure a certificate bundle for secure verification
- Off (not recommended): Turn off verification entirely (development only)
Enabling SSL CA Bundle
This is the most secure solution. You’ll download a trusted certificate bundle and configure Curator to use it.- Download the CA bundle: Visit https://curl.se/ca/cacert.pem and save the file to your server in a location readable by your web server.
-
Configure the environment variable:
Add or update the following line in your
.envfile with the full path to your downloaded CA bundle:Edit the.envfile of the Curator instance that connects to Power BI. It sits in that instance’s installation root, in the same folder as theartisanfile. On a Central Dispatch install, each managed instance has its own installation folder under the worker’s install path (for exampleC:\InterWorks\Curator\htdocs\<instance folder>). Put the setting in that managed instance’s.env, not in the Central Dispatch controller’s.env.On Windows, wrap the path in single quotes, as shown above, or use forward slashes (POWER_BI_SSL_VERIFY=C:/InterWorks/cacert.pem). Inside double quotes a backslash starts an escape sequence, so"C:\InterWorks\cacert.pem"makes the whole.envfile invalid and the site stops loading. If you need double quotes, double each backslash:"C:\\InterWorks\\cacert.pem". -
Apply the change:
If the configuration has been cached, run
php artisan config:clearfrom the instance’s installation folder, because cached configuration ignores the.envfile. Then restart the web server (Apache or IIS) so every PHP process picks up the new value. - Test the connection: Follow the steps in Test if Backend is Working to verify the error is resolved.
Disable SSL Verification
You can disable SSL verification entirely, but this creates serious security risks.-
Set the environment variable:
Add or update the following line in your
.envfile:Use the.envfile of the Curator instance that connects to Power BI, as described in Enabling SSL CA Bundle, then apply the change the same way. - Test the connection: Follow the steps in Test if Backend is Working to verify the error is resolved.