- Determine the user running Curator. This can be found on the Settings->Curator->Status page. On most systems, this will be either “apache” or “www-data” (Ubuntu).
- SSH into the webserver that is running Curator.
-
In the terminal, run a “chown” command for the user you found in Step 1.
Here are some examples:
RHEL, Amazon Linux AMI 1/2, CentOS:
Ubuntu:
- Find where Curator is installed on your system. Often, this is in C:\InterWorks\Curator.
- Within this directory, look for a folder named “htdocs” or “wwwdata”. Note: If your system has an “htdocs” folder, your Curator installation is running Apache. If your system has a “wwwdata” folder, your Curator installation is running a legacy IIS install.
- Right click on the “htdocs” or “wwwdata” folder and select “Properties”.
- On the folder’s “Properties” page, deselect the “Read-only” attribute and hit “Apply”.
- After this process has completed, select the “Security” tab.
- On the Security tab, click “Advanced”.
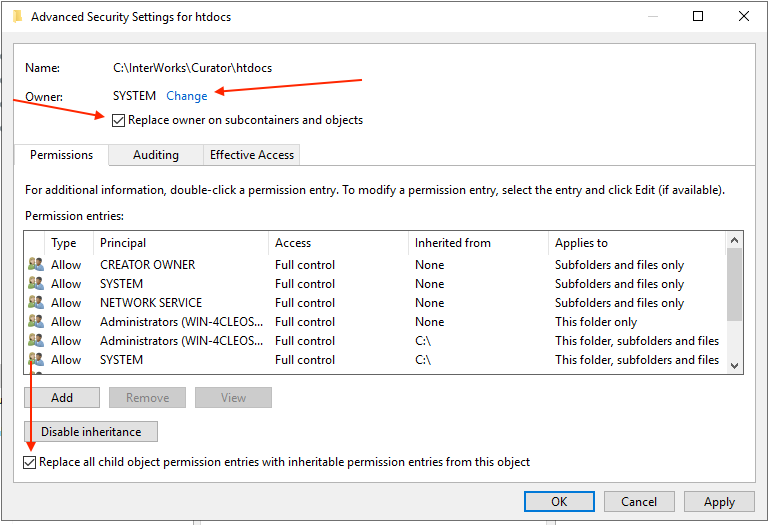
- If your folder is “htdocs” make sure “SYSTEM” is the folder’s owner. If your folder is “wwwdata”, IUSR should own the folder.
- Reselect the correct user as the owner. (Note: do this again, even if it looks correct.)
- Check the box labeled “Replace owner on sub-containers and objects”.
- Check the box labeled “Replace all child object permission entries.”
- Hit “Apply”
Automated Permissions Reset for Windows
If you encounter persistent file or folder permission issues with Curator on Windows, you can use the Curator FixPerms script to automatically reset permissions to the correct settings.Usage Instructions
- Download the FixPerms script from the link: Curator_FixPerms.exe
- Right-click on Curator_FixPerms.exe and select Run as Administrator.
- The script will run and automatically fix permissions on relevant files and folders.