

To Create a filter
- Navigate to the backend of the system (e.g.
http://curatorexample.com/backend). - Log in if prompted.
- Click on Tableau > Filters in the left-hand menu.
- Click the “New Filter” button.
- Find the details of how to set up filters in the following overview
Overview of Filter Settings
Filter Fields
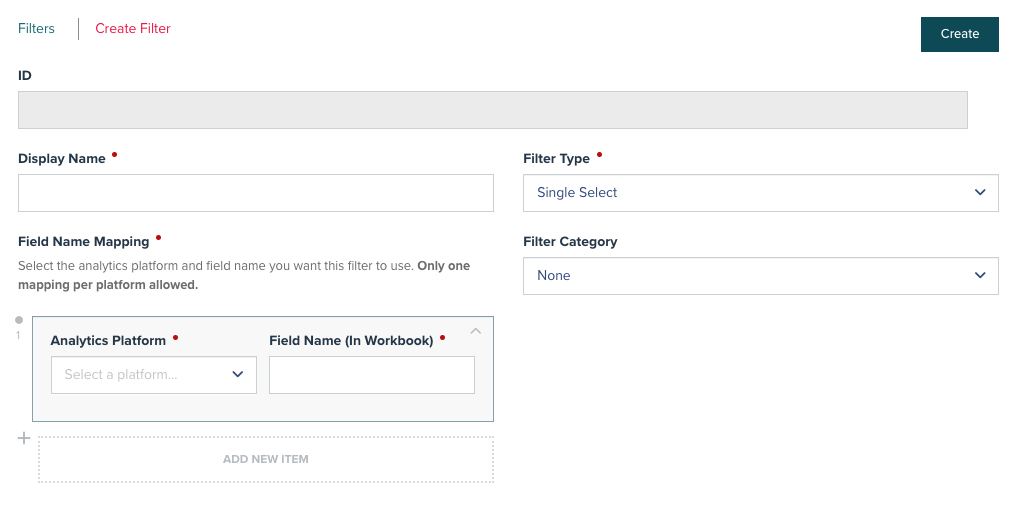
- Display Name: The name visible to users when interacting with the filter.
- Filter Type: The type of filter (e.g. Single-select, Multi-select, Date) to control this field.
- Filter Category (optional): Allows you to group filters into sections in the filter pane. See the Filter Categories Section for more information.
- Field Name Mapping: Links the filter to a specific field in the analytics platform.
- Once your Field Name Mapping is verified, you will see a teal notice appear confirming the filter has been found on your BI platform. If your Field Name Mapping could not be verified, a yellow notice appears. Use the Check All Tableau Site button if you are certain that the field name exists on a different Site.
Dashboards
- Assign filters en-masse to specific Dashboards. The filter will show as a Curator filter inside the Curator toolbar when you load a given Dashboard. You can also add filters to a specific Dashboard via the “Filters” tab on the edit Dashboard page.
Secondary Data Source
In most cases, this toggle should remain off. It is only required in specific scenarios where filtering needs to be applied to a field that is not part of the primary data source on your Tableau sheet but comes from a secondary data source. You can identify secondary data source fields in Tableau by the orange check mark in editing mode. If you need to filter on a field marked with this orange check mark:- Enable the Specify a Secondary Data Source toggle.
- Enter the name of the secondary data source (as displayed in the workbook) into the input field that appears.
The filter will then be sent to Tableau in the format of
datasource_name.filter_field_name. This ensures that the filter is correctly applied across your data sources.
Display Options
-
Sticky Filter
- Saves filter selections per user for consistent filtering across Dashboards. This is using browser cookies which will be applied to any Dashboard that uses the specified field name from the specified field name mapping. I.e. it is not only applied to the Dashboards selected in the Dashboards section above.
-
Add “All” Option
- Adds an “All” selection option for Single Select filters. If there is no “All” option for the single select filter, the first value of the field will be shown even if not yet selected. Once you started filtering you can only reset the filter by using the toolbar button “Reset”.
-
Get Filter Options from Data
- Pulls options directly from the data source to populate the filter options for a given dropdown. This will slow down the Dashboard’s load time if the Dashboard contains a lot of data. This process can be sped up by enabling “Specify Filter Sheet” from a Dashboard’s backend settings. See the Specify Filter Sheet Section for more information. If this field is disabled, you must add items via the Options list (manually) otherwise the filter will contain no options for users to select and they will only see “No results found”.
-
Cache Filter Options
- This saves the dropdown options via Curator’s cache on a user basis and will retrieve options in a more performant manner. However, the list of options may be stale given the time you set the cache to. The cache begins the first time a user loads the options, and is not related to the underlying Dashboard’s data-refresh schedule, so ensure you only enable this setting for dropdowns that rarely see new data.
- Cache Expiration Options: 4 Hours, 1 Day, 1 Week
-
Filter-Blacklist
- If you have a Filter Blacklist set up, it can be reused by toggling on Use Filter-Blacklist Group. Once enabled, you can select from you existing Blacklist Groups to be applied on this filter.
- Note, if you either don’t have a Filter Blacklist Group set up or only want specific sheets to be blacklisted, i.e. the filter to not be applied on this sheet, add the sheet names as individual items to the Sheet Blacklist list.
- More information in Filter Blacklists can be found under Hidden Sticky Filters and Parameters
Filter Types
Single Select
- Allows the frontend user to select only a single value for this filter.
Multi-Select
- Allows the frontend user to select multiple values for this filter.
Date
- Allows the frontend user to pick a date from the standard date picker widget. The date format is displayed based on the users locale settings. To successfully filter for dates make sure that the Tableau Dashboard is published with the correct specific locale settings or with automatic locale detection.
Date Range
- Allows the frontend user to pick a start and an end date from the standard date picker widget. The date format is displayed based on the users locale settings. To successfully filter for dates make sure that the Tableau Dashboard is published with the correct specific locale settings or with automatic locale detection.
Relative Date Filters
- Works similarly to Tableau’s Relative Date Filters where you get a slider to dynamically update to show a time period relative to when you open the view, such as the current week, the year to date, or the past 10 days. Relative date filters make it easy to create views that always show the most recent data (cf. Tableau Relative Date Filters).
- When you use a Relative Date Filter you will get more options to configure your filter:
- Direction: Filter by Past or Future.
- Scale: Choose Days, Months, Quarters, or Years.
- Range: Specify the maximum relative date range.
Boolean
- Allows the frontend user to select between True and False.
More on Filters
URL Filters
- You can apply filters and parameters by appending
key=valuepairs to URLs to pre-filter Dashboards. E.g. my-Curator.com/Dashboard/superstore?region=North will pre-filter my Superstore Dashboard to only show the North region. - Automatically applied when using Curator or Tableau filter UI.
- Important: Disabling “Ignore filter and parameter changes from Dashboard” prevents Report Builder from capturing filters.
Evaluation of Filters
In this order, filters are evaluated:- URL filters - Values that are appended to the Curator URL in your browser (e.g.
?Region=South) - Preloaded sticky filters - Filters identified via the Tableau Server Settings.
- Cookie-based sticky filters - Browser-session stored filters, also managed via Tableau Server Settings.
- Published filter settings - The default state of the Dashboard.
Region=North by default.
However, if they are emailed a link from a colleague sharing an insight and the URL is sent over with ?Region=South
when they click on the link, the Dashboard will be filtered to Region=South since URL filters are evaluated first
taking precedence over the Cookie-based sticky filters
Troubleshooting Filters
Filter Options are not visible
- Verify that either “Get Filter Options from Data” or the manual Options list is configured.
I want to apply a filter across Dashboards but I do not want to show the Curator Filter UI
- Use Hidden Sticky Filters instead
My view is empty after I switched tabs on my dashboards
- If your view loads briefly and then suddenly turns blank, then a filter is probably being applied that should
not be applied. That can happen if you either track filter and parameter changes in the url (a) or you have a
sticky filter enabled (b) which should not be applied to this view.
- a) Turn on Ignore Filter and Parameter Changes from Dashboard on the Dashboard level which will stop adding the changes to the url. When you switch tabs, the filter and parameter actions need to be defined in the Workbook itself. However please note, that turning this on will break Report Builder’s functionality.
- b) Apply Filter Blacklists to prevent filters being applied on specific sheets. However, this does not currently work with Hidden Sticky Filters and Parameters.
- c) Enable Re-apply filters on tab-switch globally via Settings → Tableau → Tableau Server Settings → General. This setting is on by default. When enabled, filters and parameters applied during a session are carried over to other dashboards on tab switch. When disabled, each tab keeps its own isolated filter state: switching to a new tab restores only the filters that were applied on that tab. See Re-apply Filters on Tab-switch for full details.
My sticky filters stop applying after I am asked to log back in
- Sticky filters are stored in your browser, not in your Curator login session. A session timeout, or being asked to log back in, does not clear them by itself. Selecting the filter value again writes it back to the browser and applies on the next Dashboard load.
- They are stored as browser-session values, so they last until the browser is closed completely — closing a tab is not enough, but quitting and reopening the browser discards them. This is the most common reason sticky filters appear to reset “randomly” at around the same time as a login prompt: both are triggered by the same break in browsing, rather than one causing the other.
- Anything that discards site cookies discards sticky filters with them. Check for private/incognito windows, “clear cookies on exit” browser settings, strict tracking-protection modes, and device cleanup tools.
- The toolbar Reset button intentionally erases the stored sticky filter and parameter values for the Dashboard. If users report that filters stop sticking, confirm that Reset is not being clicked before reloading.
- Switching Tableau Site or Project is separate and is tied to the login session. The selected Site/Project controls which projects and workbooks are listed in your menus, and it reverts to showing all of them when the session expires. That changes which Dashboards you see listed, but it does not clear your sticky filter values.
Date Filters show differently for my global users
- That is not necessarily an issue because Curator can handle locale date formats.
- Locale-specific formats (e.g., DD/MM/YYYY, MM/DD/YYYY) depend on:
- Browser language settings.
- Tableau User Language and Region settings.
- As long as your Workbook is flexible with date formats, Curator will handle dates for your different users and present them the format they are used to based on their settings.
Date Filters do not filter properly
- This is mostly due to a locale mismatch: Ensure browser and Tableau settings align. You have three options:
- When you have multiple regions that are working with your Dashboard, make sure that the Workbook’s locale is set to automatic when published to Tableau. It will then adjust to your users location which Curator will also look pick up and then send the date in the expected format.
- If you require a specific format you can also force the browser to use the specific locale date format instead which again Curator will pick up.
- You can also use dates in YYYY-MM-DD format and it will ignore any browser or Workbook settings and just handle dates correctly in that format.